How to Replace Brake Pads and Rotors on a Xterra (DIY)
DIY brake pad and rotor replacement for Nissan Xterra (2000-2015): gen 1 vs gen 2 differences, caliper torque specs, bedding-in, and safety warnings.
One-tap dark, screen-awake, step-by-step reading for hands-on work.
How to Replace Brake Pads and Rotors on a Nissan Xterra (Complete Guide)
Is your trusty Nissan Xterra making a high-pitched squeal when you tap the brakes? Does the pedal feel spongy, or are you hearing a dreadful grinding sound? These are classic signs that your brake system needs attention. While it might seem like a daunting task reserved for a professional shop, replacing the brake pads and rotors on your Xterra is a very manageable DIY project for the home mechanic. It's a fantastic way to save a significant amount of money and gain a deeper understanding of your vehicle's most critical safety system.
A successful Nissan Xterra brake job hinges on having the right parts, the right tools, and a clear, step-by-step plan. This comprehensive guide is designed to walk you through the entire process, from identifying the correct components for your specific model year to the final, crucial step of bedding in your new brakes. We'll cover the key differences between the first and second-generation Xterras, provide essential torque specs, and share pro tips to ensure your brake service is a complete success.
Whether you're tackling a front brake replacement on a 1st Gen or a full four-wheel Xterra brake rotor replacement on a 2nd Gen, you've come to the right place. Let's get your hands dirty and restore that confident, solid stopping power to your rugged SUV.
Know Your Xterra: Key Brake System Differences (Gen 1 vs. Gen 2)
Before you order a single part, it's vital to identify your Xterra's generation. The first generation (2000–2004) and second generation (2005–2015) have distinct brake systems, and parts are generally not interchangeable. Using the wrong components can lead to improper fitment, poor performance, and serious safety risks.
The most significant changes between generations involve rotor size and the rear brake setup. Second-generation models received an upgrade to larger front rotors for better heat dissipation and stopping power, and they transitioned from rear drum brakes to a more modern rear disc brake system.
| Component | 1st Generation (2000–2004) | 2nd Generation (2005–2015) |
|---|---|---|
| Front Rotors | Approx. 11.1″ (283 mm) diameter | Approx. 11.6″ (296 mm) diameter |
| Rear Brakes | Drum brakes (with brake shoes) | Disc brakes (with brake pads) |
| Parking Brake | Integrated into the rear drum | Small drum-in-hat system inside the rear rotor |
Master your Xterra's upkeep with our Complete DIY Maintenance Guide for Nissan Xterra (2000-2015) and save money on routine maintenance tasks.
Essential Tools & Materials for Your Xterra Brake Job
A successful and safe Nissan Xterra brake service starts with having all your tools and supplies laid out and ready to go. Fumbling for the right socket or having to make a mid-job parts run is frustrating and can lead to mistakes. Gather the following items before you begin.
Required Tools:
- Hydraulic Floor Jack & Heavy-Duty Jack Stands
- Wheel Chocks
- Lug Wrench or Impact Wrench
- Ratchet with a set of Metric Sockets (typically 14mm, 17mm, 19mm)
- Torque Wrench (Non-negotiable for safety)
- C-Clamp or Brake Piston Retraction Tool
- Wire Brush
- Brake Caliper Hanger or a Sturdy Wire/Bungee Cord
- Safety Glasses and Gloves
- Flathead Screwdriver or Brake Spoon (for 1st-gen rear drums)
- Drain Pan (for bleeding brakes)
Required Materials:
- New Brake Pads (and/or Shoes for 1st-gen rear)
- New Brake Rotors (and/or Drums for 1st-gen rear)
- Brake Hardware Kit (shims, anti-rattle clips)
- High-Temperature Brake Grease
- Brake Cleaner Spray
- Shop Rags or Towels
- Fresh DOT 3 or DOT 4 Brake Fluid (check your master cylinder cap)
Choosing the Right Brake Parts for Your Nissan Xterra
When it comes to brakes, quality matters. While it can be tempting to buy the cheapest parts available, investing in high-quality OEM or reputable aftermarket components will pay dividends in performance, noise reduction, and longevity. Here’s what you need to know when selecting parts for your Nissan Xterra brake pad replacement.
Brake Pads & Shoes
For 1st-generation models (2000-2004), you'll need front brake pads and rear brake shoes. For 2nd-generation models (2005-2015), you'll need both front and rear brake pads. Reputable aftermarket brands like Bosch, Wagner, or Centric offer excellent performance, often meeting or exceeding OEM standards. For example, a common aftermarket rear shoe set for 1st-gen models is the Wearever S631. Always verify the part number fits your specific year, engine, and drivetrain (2WD vs. 4WD).
Brake Rotors & Drums
The most critical specification for rotors is the diameter. As noted, 1st-gen Xterras use smaller ~283 mm front rotors, while 2nd-gen models use larger ~296 mm front rotors. The rear system is the other major difference: 1st-gen models use brake drums, while 2nd-gen models use rear disc rotors (approx. 286 mm). When replacing rotors, it's best practice to replace them in pairs (both fronts or both rears) to ensure even braking.
Don't Forget the Hardware & Fluid!
This is a step many DIYers skip, but it's crucial for a quiet, long-lasting brake job.
- Brake Hardware: Always install the new shims and anti-rattle clips that come with your new brake pads. This hardware positions the pads correctly and prevents vibration and squealing.
- Brake Fluid: Your Nissan Xterra uses either DOT 3 or DOT 4 brake fluid. Check the cap on your master cylinder reservoir to be certain. It's a great time to flush your brake fluid if it's dark or hasn't been changed in over two years.
Step-by-Step Guide: Nissan Xterra Brake Pad and Rotor Replacement
With your new parts and tools organized, you're ready to tackle the job. Follow these steps methodically, and don't rush. Safety is the top priority. This guide primarily covers the more common disc brake setup, with notes for the 1st-gen rear drums.
- Preparation & Safety First
Park your Xterra on a level, solid surface. Engage the parking brake firmly and place wheel chocks behind the rear tires (if working on the front) or in front of the front tires (if working on the rear). While the vehicle is still on the ground, use your lug wrench to break the lug nuts loose on the wheel you'll be removing first, but don't remove them completely. - Lift and Secure the Vehicle
Place your floor jack under a factory-specified lift point on the frame or pinch weld. Raise the vehicle until the wheel is off the ground, then immediately place a jack stand under a secure part of the frame nearby. Slowly lower the jack until the vehicle's weight is resting securely on the jack stand. Never work on a vehicle supported only by a jack. - Remove the Wheel & Caliper
Finish unscrewing the lug nuts and remove the wheel. This will expose the brake assembly. Locate the two caliper mounting bolts on the back of the caliper (usually 14mm). Remove these bolts, and the caliper should slide off the rotor. Do not let the caliper hang by its brake hose. This can damage the hose. Use a caliper hanger or a bungee cord to suspend it from the coil spring or another sturdy suspension component. - Remove Old Pads and Rotor
The old brake pads should now slide out of the caliper bracket. Note how the shims and clips are oriented. Next, to remove the rotor, you may need to remove a large caliper bracket held on by two larger bolts. Once the bracket is off, the rotor should pull straight off the hub. If it's stuck due to rust, a few firm taps with a mallet on the back side can help break it loose. - Inspect All Components
With everything disassembled, now is the time for inspection. Check the caliper piston and its rubber boot for any signs of fluid leaks or tears. Ensure the caliper guide pins slide freely in and out; if they are stiff, remove, clean, and re-lubricate them. Inspect the brake hose for any cracks or bulges. - Compress the Caliper Piston
To make room for the thick new brake pads, you must push the caliper piston back into its bore. Place an old brake pad over the piston face and use a C-clamp or a dedicated piston tool to slowly and evenly press the piston back until it is flush with the caliper housing. Keep an eye on the brake fluid level in the master cylinder reservoir to ensure it doesn't overflow. - Install the New Rotor and Hardware
Use a wire brush to clean any rust or debris from the wheel hub surface for a clean mating surface for the new rotor. Slide the new rotor onto the wheel studs. Next, pop out the old anti-rattle clips from the caliper bracket and install the new ones that came with your pads. - Install New Brake Pads
Apply a thin layer of high-temperature brake grease to the contact points on the back of the new brake pads and on the edges where they slide into the new clips. Do not get any grease on the pad friction surface or the rotor. Fit the new pads into the caliper bracket. - Reinstall the Caliper
Carefully place the caliper back over the new pads and rotor. Re-install the caliper mounting bolts and tighten them by hand first. Then, use your torque wrench to tighten them to the proper specification. - Reinstall the Wheel
Mount the wheel back onto the hub and thread the lug nuts on by hand. Lower the vehicle off the jack stand. Once the tire is on the ground, use your torque wrench to tighten the lug nuts in a star pattern to the correct specification. - Bed-In Your New Brakes
This is a critical final step. Find a safe, open road. Perform a series of 5-6 moderate stops from about 40 mph down to 10 mph. Then, perform another 2-3 harder stops from 55 mph down to 15 mph. Do not come to a complete stop. This process transfers an even layer of pad material onto the rotor, which prevents vibration and ensures maximum stopping power. Allow the brakes to cool by driving normally for several minutes afterward. - Final Checks
Pump the brake pedal a few times until it feels firm. Check the brake fluid level in the master cylinder and top it off if necessary. Double-check that the parking brake is working correctly.
Critical Torque Specifications & Safety Warnings
Using a torque wrench isn't optional; it's essential for ensuring that critical components don't come loose or get damaged from over-tightening. These values are common for the Nissan Xterra, but you should always consult a service manual for your specific year and model for 100% accuracy.
Disclaimer: Always verify torque specifications for your exact model year and trim with a reliable service manual. The values below are common estimates and should be used as a guideline.
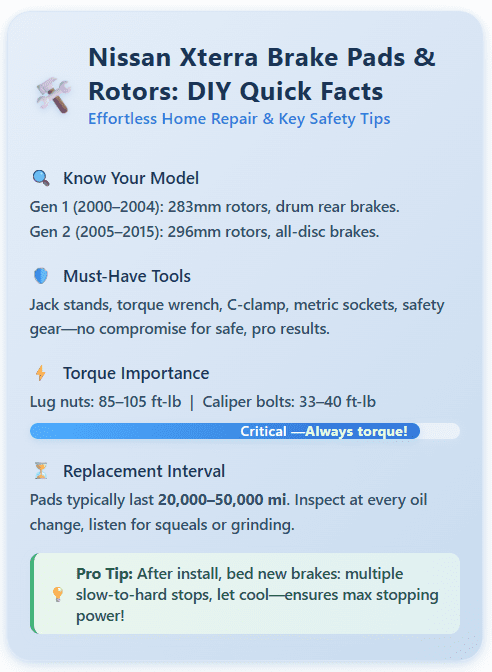
- Wheel Lug Nuts: 85–105 ft-lb (115–142 N·m)
- Caliper Mounting Bolts: 33–40 ft-lb (44–54 N·m)
- Bleeder Screws: ~10-14 ft-lb (snug, do not overtighten)
Safety Is Your #1 Priority:
- Vehicle Support: Never get under a vehicle that is only supported by a jack. Always use properly rated jack stands on a solid, level surface.
- Brake Dust: Old brake pads may contain harmful materials. Avoid blowing brake dust into the air with compressed air. Use brake cleaner and a rag to wipe down components.
- Brake Fluid: Brake fluid is corrosive to paint and can irritate the skin. Wear gloves and clean up any spills immediately. Keep the fluid container sealed, as it absorbs moisture from the air.
When to Service Your Brakes: Maintenance & Signs of Wear
A proactive approach to brake maintenance will keep you safe and save you from more expensive repairs down the road. Knowing the warning signs of a failing brake system is key for every Xterra owner.
Key Signs Your Brakes Need Service:
- A high-pitched squeal when braking (this is the wear indicator).
- A deep, metallic grinding noise (this means you've worn past the pad material).
- The vehicle pulling to one side when you apply the brakes.
- A spongy or soft feeling in the brake pedal.
- Visible grooves or scoring on the surface of the brake rotors.
Inspect your brakes during every oil change, or at least every 5,000-7,000 miles. Under normal driving conditions, brake pads can last anywhere from 20,000 to 50,000 miles, but this can be much shorter if you do a lot of towing, off-roading, or city driving.
Pro Tips for a Flawless Xterra Brake Job
- Take a Picture First: Before you take anything apart, snap a quick photo with your phone. This gives you a perfect reference for how the clips, springs, and pads should be reinstalled.
- Open the Reservoir Cap: Before you use a C-clamp to compress the caliper piston, remove the cap from the master cylinder reservoir. This relieves pressure in the system and prevents damage to seals. Just be sure to place a rag around it to catch any potential overflow.
- Clean and Lubricate Guide Pins: Sticking caliper guide pins are a leading cause of uneven pad wear. Pull them out, wipe them clean with a rag, and apply a fresh coat of high-temperature brake grease before reinstalling.
- Re-Torque Your Lug Nuts: After driving about 50 miles on your new brakes, it's a great safety practice to re-check the torque on your lug nuts to ensure they are still perfectly tightened.
FAQ
1. What tools do I need to replace brake pads and rotors on a Nissan Xterra?
To change the brake pads and rotors, you'll need a hydraulic floor jack, jack stands, wheel chocks, a lug wrench or impact wrench, a ratchet with metric sockets (usually 14mm, 17mm, 19mm), a torque wrench, a C-clamp or piston tool, a wire brush, caliper hanger, safety glasses, gloves, flathead screwdriver (for 1st-gen rear drums), and a drain pan for brake bleeding.
2. What are the differences between 1st and 2nd generation Nissan Xterra brake systems?
The 1st generation (2000–2004) uses smaller front rotors (about 283 mm) and rear drum brakes, while the 2nd generation (2005–2015) has larger front rotors (about 296 mm) and upgraded rear disc brakes. The parking brake system also differs between generations.
3. What torque specifications are recommended for a Nissan Xterra brake job?
Typical torque values: Wheel lug nuts: 85–105 ft-lb (115–142 Nm); caliper mounting bolts: 33–40 ft-lb (44–54 Nm); bleeder screws: 10-14 ft-lb. Always verify these with your specific service manual.
4. How do I properly “bed in” new brake pads and rotors?
After installation, perform 5-6 moderate stops from 40 mph to 10 mph, followed by 2-3 harder stops from 55 mph to 15 mph. Do not come to a complete stop, and allow brakes to cool by driving normally for a few minutes. This process helps transfer an even layer of pad material to the rotor for optimal performance.
5. What are the signs that my Nissan Xterra brakes need service or replacement?
Look out for high-pitched squeals, grinding noises, vehicle pulling to one side while braking, a spongy brake pedal, or visible grooves on the rotors. Regularly inspect your brakes every 5,000–7,000 miles or during oil changes.
6. Is it safe for a DIYer to replace Nissan Xterra brake pads and rotors at home?
Yes, with the right tools, quality parts, and attention to safety procedures shown in this guide, most mechanically inclined DIYers can safely perform a brake service at home. Always use jack stands, follow torque specs, and double-check your work before driving.
Conclusion - brake pad and rotor replacement
Congratulations! By following this guide, you’ve successfully completed a full Nissan Xterra brake pad and rotor replacement. You've not only restored one of your vehicle's most critical safety systems to peak performance but also saved a considerable amount of money and gained invaluable hands-on mechanical experience. The confidence that comes from knowing the job was done right, with quality parts torqued to spec, is something no repair shop can give you.
Remember to properly dispose of your old brake fluid and used parts according to your local regulations. With your brakes feeling firm and responsive, take a moment to double-check the fluid level in the master cylinder one last time. Now you can get back on the road - or the trail - with the peace of mind that your rugged Nissan Xterra will stop safely and reliably every single time.