Xterra Common Problems & DIY Fixes: Guide
The complete guide to Nissan Xterra common problems: timing chain wear, SMOD radiator failure, fuel gauge faults, frame rust, and leaf sag, with DIY fixes.
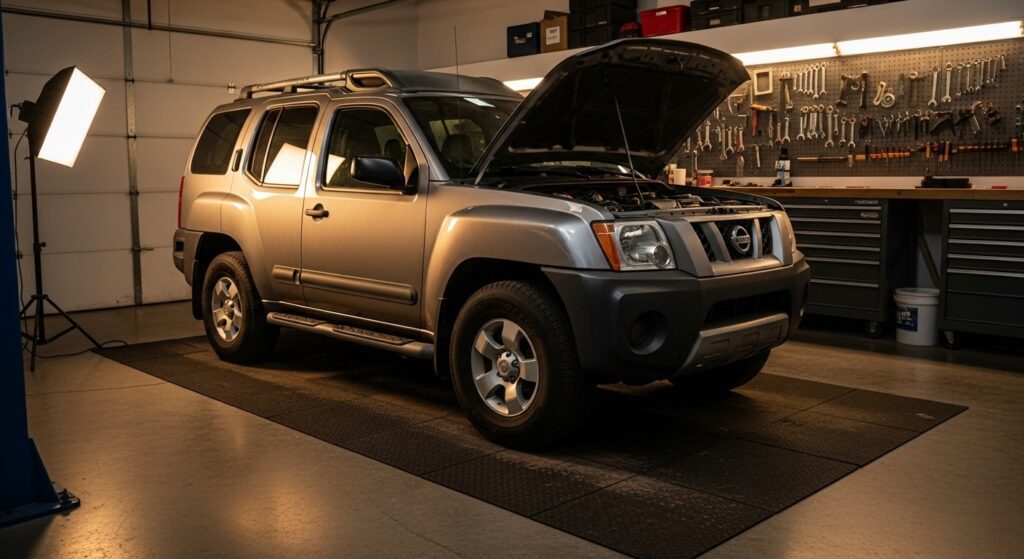
Nissan Xterra Common Problems & DIY Fixes – Complete Owner’s Guide
The Nissan Xterra is a rugged, body-on-frame SUV beloved by adventure enthusiasts for its off-road capability and durability. First introduced for the 2000 model year, the Xterra was produced across two generations until 2015. While generally reliable (scoring 3.9/5 on RepairPal and 3/5 on Consumer Reports), every Xterra accumulates its share of quirks and issues over time. In this guide, we’ll dive into Nissan Xterra common problems by category – from engines and transmissions to electrical gremlins – and provide DIY fixes and maintenance tips.
Whether you own an early first-generation (2000–2004) or a later second-gen (2005–2015) Xterra, this complete repair guide will help you diagnose issues, understand which fixes you can tackle yourself, and know when to seek professional help. Let’s keep your Xterra trail-ready and reliable for years to come!
This SUV’s go-anywhere design is paired with a few well-documented common issues owners should watch for.
Common Engine Problems and DIY Fixes
The Xterra’s engines (the 3.3L V6 in 2000–2004 models and the 4.0L V6 in 2005–2015) are robust, but several engine-related issues have emerged as the miles add up. Below we cover the most frequent engine problems – from timing chain noises to sensor failures – along with DIY repair tips and difficulty levels for each.
Timing Chain Tensioner Wear (Whining Noise)
Difficulty: (Very Advanced). If you’re not completely comfortable, it’s wise to seek professional help for this fix due to its complexity.
One notorious problem on second-generation Xterras (especially 2005–2010 models) is premature wear of the timing chain tensioner guides. Nissan used timing chains with rough edges that sawed through the plastic chain guides early, causing a telltale whining or rattling noise from the front of the engine. If ignored, a loose timing chain can lead to erratic timing, reduced power, and even catastrophic engine damage (bent valves or worse).
BEST Recommended product: >> Engine Timing Chain Kit
DIY Fix: Replacing the timing chain, tensioners, and guides is a major repair – typically a difficult, advanced DIY job best suited for experienced mechanics. It involves removing the front engine cover, which can take 8+ hours. However, many owners have tackled it using detailed guides and patience. If you choose to DIY, ensure you have a service manual and consider using OEM or high-quality parts (Nissan even settled a class-action to reimburse owners for timing chain repairs). Expect parts cost around $300–$500, and professional labor can exceed $1,500 (total ~$2,000+).
When to seek a pro: If the engine has been making a prolonged whining or rattling noise and especially if it has lost power or developed misfire codes, a mechanic should inspect it. Nissan issued Technical Service Bulletins for the timing chain noise, and a class-action lawsuit led Nissan to partially cover repair costs on certain 2005–2010 models. Don’t ignore the signs – catching it early can prevent a chain failure that might destroy the engine.
Camshaft/Crankshaft Position Sensor Failure
Difficulty: (Easy) – generally one of the simpler fixes, taking about 1 hour.
Another common engine issue – particularly on higher-mileage second-gen Xterras – is failure of the camshaft or crankshaft position sensors. These sensors help manage engine timing. When they start to fail (often around the 80k–100k mile mark), you might experience rough running, intermittent stalling, or trouble starting. The Check Engine Light will usually come on with codes like P0340/P0345 (cam sensor) or P0335 (crank sensor).
BEST Recommended product:
>> Premium Camshaft Position Sensor <<
DIY Fix: Replacing these sensors is a moderate DIY job that most enthusiasts can handle with basic tools. The camshaft position sensors (two on the 4.0L engine) are typically accessible on the engine heads, and the crankshaft sensor is on the engine block (often near the transmission bellhousing). Steps: 1) Disconnect the battery. 2) Locate the faulty sensor (per a repair manual or code reader guidance). 3) Unplug the sensor’s electrical connector. 4) Remove the single bolt holding the sensor and pull it out. 5) Install the new sensor and reconnect. Always opt for OEM or quality sensors (Hitachi makes Nissan’s sensors) to ensure reliability.
Tip: It’s good preventative maintenance to replace these sensors proactively around 100,000 miles. A failing sensor can cause sudden stalling – not fun if you’re off-road or in traffic. If your Xterra cranks but won’t start, or randomly dies, these sensors are prime suspects. Fortunately, they’re inexpensive (around $20–$50 each) and quick to swap out.
Fuel Injector & EGR Valve Issues (First-Gen Xterra)
Difficulty: (Intermediate). If only one injector is bad, you can replace that single unit (about $50–$100 each). Be sure to relieve fuel pressure and disconnect the battery first. After replacement, clear the codes and test for smooth operation.
Early first-generation Xterra (2000–2001 model shown) owners faced some unique engine issues like fuel injector failures and clogged EGR valves, which can cause misfires and poor performance.
Owners of 2000–2004 Xterras (first generation) have reported frequent fuel injector problems. A failing injector can cause one cylinder to misfire, leading to a rough idle, loss of power, and a blinking check-engine light. In fact, fuel injector failure was common in 2000–2004 models, and replacing the bad injector typically resolves the misfire. Alongside injectors, clogged EGR valves were also noted in some early Xterras (especially 2000 and 2002 model years). Carbon build-up in the Exhaust Gas Recirculation valve can trigger engine hesitation or misfires when accelerating.
BEST Recommended product:
>> Exhaust Gas Recirculation Valve <<
DIY Fix (Injectors): Replacing a fuel injector on the 3.3L V6 is a moderate job. It requires removing the upper intake manifold to access the injectors. DIY mechanics with intermediate skills can handle it in a few hours. It’s often wise to replace all injector o-rings or multiple injectors while you’re in there, since others may be not far behind.
DIY Fix (EGR Valve): Cleaning the EGR valve is relatively easy. Remove the EGR valve (usually two bolts and a pipe connection), spray it with throttle body or carb cleaner to remove carbon deposits, and also clean out the EGR passage in the intake manifold. Often this restores proper function. If the valve is too clogged or the diaphragm is bad, replace the EGR valve (new ones typically $100–$200).
Difficulty: (Easy to Moderate). This fix can cure those surging or stumbling issues when you hit the gas. Always use a new gasket when reinstalling the EGR valve to prevent leaks.
Other Engine Troubles to Watch For
- Exhaust Manifold Cracks (2000–2004): The first-gen’s 3.3L V6 had a known tendency to crack the right-side exhaust manifold over time (a Nissan TSB was issued). A leak here can cause ticking noises and reduced performance. Fixing it involves replacing the manifold (or installing headers) – moderate difficulty due to rusty bolts. Many owners upgraded to aftermarket headers to permanently solve this.
- Oil Cooler O-Ring Leak (2005–2015): On the 4.0L V6, a minor but common leak source is the O-ring seal on the engine oil cooler (where the oil filter mounts). If you see oil dripping around the oil filter area, this could be the culprit. The fix is straightforward: remove the oil filter, tighten or replace the seal behind the cooler (a cheap part). Do this at your next oil change – an easy DIY that can save your engine from slowly losing oil.
- Cooling System Issues: Aside from the big radiator problem (covered below in the transmission section), ensure basic cooling maintenance. Stuck thermostats or old coolant can cause overheating, which is especially hard on the Xterra’s cylinder heads. Always address any cooling issue promptly to avoid engine damage.
Transmission & Drivetrain Problems (SMOD, Differentials, etc.)
The transmission and 4x4 drivetrain in the Xterra are tough, but a few serious issues have cropped up – most infamously the radiator/transmission fluid cross-contamination known as the “Strawberry Milkshake of Death.” This category also includes weaknesses in the driveline like differential failures. Let’s break down the most common transmission and drivetrain problems, and how to fix or prevent them.
Radiator Leaks & “Strawberry Milkshake of Death” (SMOD)
Difficulty: (Intermediate).
BEST Recommended product:
>> Radiator for your Xterra <<
By far the most notorious Xterra issue is the coolant leaking into the transmission on 2005–2010 models with automatic transmissions. Nissan used a radiator design with an internal transmission fluid cooler that can crack, allowing engine coolant and ATF to mix.
The resulting concoction turns into a frothy pink fluid – hence the nickname “Strawberry Milkshake of Death” (SMOD) among Xterra owners. Once coolant contaminates the transmission, it often leads to transmission failure if not caught early. Symptoms include transmission shuddering, difficulty shifting, or an overheated transmission. You might also notice an oily pink milkshake in the radiator overflow tank.
Prevention (DIY): If you have a 2005–2010 Xterra and it still has the original radiator, act now to prevent SMOD. Nissan addressed the issue with an updated radiator design around mid-2010, so replacing the radiator is the best long-term fix. A DIY radiator replacement is doable in a few hours with basic tools: drain coolant, disconnect hoses and transmission cooler lines, remove the old radiator and drop in a new one. Many owners opt for an aftermarket all-aluminum radiator (e.g., Koyorad) or the Nissan “Value Advantage” updated radiator.
An alternative quick fix is the “radiator bypass”, where you reroute the transmission cooler lines to an external cooler, isolating them from the radiator. This can be done in under an hour as a temporary measure to protect the transmission. However, note that bypassing means your transmission fluid won’t warm up as quickly in cold climates (and may run slightly hotter when towing), so a proper radiator replacement is preferable when possible.
DIY Fix (if contamination occurred): If you’ve already got SMOD (signs of pink fluid mix), stop driving the truck immediately to limit damage. A less severe case might be salvaged by an aggressive flush of the transmission and cooling system and installing a new radiator. Drain and refill the transmission multiple times to purge contaminated fluid, and completely flush the cooling system (including heater core).
Unfortunately, in many cases by the time you notice issues, the transmission’s internal clutches are damaged. Full transmission rebuild or replacement is then the only cure. This is a complex job best left to professionals or transmission specialists.
It can cost $3,000–$5,000 to replace the transmission, so prevention is key. Nissan extended the radiator warranty to 8 years/80k miles for these models, but many Xterras didn’t experience failure until beyond that mileage, leaving owners on the hook.
Automatic Transmission Failures (2005–2007)
Outside of SMOD-related issues, the Xterra’s 5-speed automatic is generally solid. However, sustained driving with contaminated fluid inevitably causes transmission failure, which is why 2005 is the top complaint year for Xterra transmissions. If your Xterra’s transmission has already failed (e.g. won’t shift into gear, severe slipping, or no movement), a rebuild or replacement is required. Given the cost and difficulty, this goes beyond DIY. For a high-mileage Xterra with a bad transmission, owners sometimes swap in a used unit from a salvage vehicle to save money.
When to seek professional help: Replacing or rebuilding an automatic transmission is very difficult without a lift and transmission jack. If you reach this unfortunate point, it’s best handled by a transmission shop or dealership.
On a positive note, manual transmission Xterras (available in some years/trims) do not suffer from SMOD since they have no internal radiator cooler. The 6-speed manual is fairly stout. Just maintain your clutch and fluid – if you feel grinding gears, change the gear oil; if the clutch is slipping, a clutch kit replacement is a moderate DIY () or a professional job depending on your experience.
Drivetrain and 4x4 Issues
Beyond the transmission, Xterra owners have identified a couple of drivetrain weak links, especially if you off-road or have larger tires:
- Weak Front Differential (2005–2015 4x4 models): The front diff in second-gen Xterras (especially 2005–2010) can be a point of failure if the vehicle is subject to hard off-road use (spinning tires that suddenly catch traction, for example). The front ring-and-pinion gears or housing can break under shock loads. Upgrading to stronger aftermarket gears or swapping in a tougher Titan pickup differential is a known solution among hard-core off-roaders. For the average owner, just be mindful – aggressive off-roading could necessitate an expensive diff rebuild. If you hear loud clunks from the front under power, inspect the diff. This fix is not typically DIY unless you’re experienced in setting gear lash; a drivetrain shop can rebuild or re-gear the diff as needed.
- Leaking Rear Axle Seals (Clogged Breather): A common maintenance oversight is the rear differential breather. The stock breather can get clogged, causing pressure buildup in the axle. The pressure then forces gear oil out through the axle seals, leading to leaks and even rear brake contamination. Prevention: Install a differential breather extension kit – an inexpensive DIY project ( easy) where you relocate the breather to a higher, less dirt-prone location via a hose. This mod ensures the diff can vent properly and is popular among forum enthusiasts. If you already have a leak, you’ll need to replace the axle seals and refill the diff oil – doable for an intermediate DIYer with the right tools (bearing puller, etc.), or have a shop handle it if you’re unsure.
- 4x4 Hub and Transfer Case Issues: Both generations use a traditional 4x4 transfer case. It’s generally trouble-free, but make sure to engage 4WD monthly to keep things lubricated. If the 4WD won’t engage, it could be an electronic switch (on second gens) or the transfer case mechanism – start with checking the 4WD actuator or 4WD fuse/relay. First-gen models with manual locking hubs can have hub assemblies wear out; luckily they’re simple to replace (just a few bolts).
BEST Recommended product:
>> Differential Breather KIT, Remove Air Pressure from Differentials <<
Suspension & Chassis Problems
Though not drivetrain per se, it’s worth noting common suspension issues that many Xterra owners encounter:
- Sagging or Broken Leaf Springs: The Xterra’s rear leaf springs tend to lose their arch and sag over time, especially on the passenger side. Many owners eventually find a leaf snapped in the right rear. This issue often shows up as the truck leaning or bottoming out on bumps. Fix: Replace the leaf springs – ideally both sides to maintain even ride height. This is a moderate DIY job (requires safely lifting the truck, unbolting the U-bolts, etc.). Aftermarket springs (e.g., heavy-duty or add-a-leaf kits) are popular upgrades that also lift the rear slightly.
Difficulty is due to heavy parts; use caution and proper jack stands. - Weak Rear Hatch Struts: The tailgate lift struts often wear out, causing the hatch to not stay up. The fix is trivial – snap in new struts (cost ~$30 for a pair) in minutes ( easy). It’s a small annoyance, but an easy DIY win.
- Squeaky Hood Hinges: A chirping or squeak from the front end over bumps is often just the hood bump stops rubbing. Owners have fixed this by sticking felt pads under the hood stops – a true DIY hack that costs pennies and takes minutes!
BEST Recommended product:
>> Xterra Rear Leaf Spring <<
We’ll cover more preventive maintenance and how to avoid these issues in a later section. But next, let’s look at the electrical quirks and minor issues that are also common on the Xterra.
Electrical & Interior Issues
Electrical problems on the Xterra are relatively few but can be frustrating – chiefly the fuel level sensor failure that triggers erratic gas gauge readings. We’ll also touch on other common issues like EVAP system clogs and some interior bits.
Faulty Fuel Level Sensor (Gas Gauge Not Working)
Difficulty: if dropping the tank (Intermediate), or if via access panel (Easy/Moderate).
If your fuel gauge says half-full when you’re actually running on fumes, you’re not alone. A failing fuel level sensor (fuel sending unit) is one of the top Nissan Xterra issues. This problem is prevalent on 2001–2011 Xterras, with a spike in failures around the 2005–2009 models. Nissan even issued a recall for 2006–2008 Xterras to replace faulty fuel level sending units. The symptom is a fuel gauge that’s inaccurate or stuck, which can lead to running out of fuel unexpectedly (and even stalling).
BEST Recommended product:
>> Fuel Level Sending Unit Replacement for Nissan Xterra <<
DIY Fix: Replacing the fuel sending unit is a moderate job. The unit (which includes the float sensor) is mounted in the fuel tank. On some Xterras, you’re in luck – there’s an access panel under the rear seat that allows you to reach the fuel pump/sender assembly without dropping the tank.
If so, it’s relatively easy: 1) Disconnect the battery (fuel vapor safety), 2) Open the access cover and unplug the electrical connector, 3) Remove the lock ring or bolts securing the fuel pump/sender assembly, and 4) Lift it out to replace the sensor or entire module. If you don’t have an access panel, you’ll need to drain and lower the fuel tank – adding some complexity (ensure it’s near empty and use a transmission jack to support the tank).
The part cost ranges from $90 for just the sensor to $300+ for the full pump assembly. Once replaced, your fuel gauge should read correctly again. Pro tip: Use a genuine Nissan or OEM supplier (Bosch) unit for longevity – many aftermarket cheap sensors don’t last.
EVAP Vent Clog (Difficulty Filling Gas)
Difficulty: (Easy).
Some Xterra owners have encountered issues at the gas pump – the pump clicking off repeatedly or fuel spilling back due to a clogged EVAP vent system. NissanProblems.com notes that EVAP clogs can cause “gas splash back” during refueling. This often is due to the EVAP vent valve or charcoal canister becoming saturated or clogged (sometimes from topping off the tank too much, or dust intrusion).
DIY Fix: First, check if there are any EVAP-related trouble codes (like P0447, P0455). Replacing the vent control valve (located near the charcoal canister by the rear spare tire area) is usually the cure. It’s a fairly easy replacement – unplug the old valve, remove a couple of bolts, and swap it out. Also ensure the vent hose isn’t kinked or blocked.
BEST Recommended product:
>> EVAP Vapor Canister Vent Valve <<
After replacement, the tank should breathe during refueling and the pump should no longer shut off early. It’s also wise to occasionally blow compressed air through the vent line to keep it clear if you drive in a lot of dust or mud. Avoid overfilling the gas tank once the pump clicks off, as that can flood the EVAP system.
IPDM Relay Recall (Engine Stall Fix)
One electrical-related recall worth mentioning: On some 2005–2006 Xterras, Nissan had a recall to replace a relay in the Intelligent Power Distribution Module (IPDM). A bad ECM relay in the IPDM could cause sudden engine stalling while driving – a serious safety issue. Under Recall ID 10V-517, Nissan dealers replaced the defective relay free of charge. If you have an Xterra in that year range and experience random stalling with no codes, ensure this recall was performed (any Nissan dealer can check your VIN for open recalls). If not, the relay itself is a cheap part – a DIY replacement is possible (the IPDM is a box under the hood with plug-in relays). Simply swap the ECM relay for the updated part. Difficulty: (Very Easy). This is more of a preventative fix, but it’s good to be aware since a failing relay can be confused with other problems.
Interior and Other Annoyances
- Headliner Sagging: Particularly on 2002–2004 Xterras, the interior headliner fabric can separate and sag or peel. It’s mostly a cosmetic issue but can be distracting. A DIY fix is to remove the headliner board and reupholster it with new fabric (kits are ~$50). It’s a somewhat time-consuming but low-skill job – lots of trim removal. Alternatively, a local upholstery shop can fix it for a few hundred dollars.
- Sunroof Rattles/Exploding Sunroof: Some second-gen models with sunroofs had reports of the glass rattling or even shattering unexpectedly. This is not super common, but it did prompt lawsuits accusing Nissan of using faulty tempered glass after 2008. If you have a factory sunroof, keep an eye (and ear) on it. There’s no real DIY “fix” for the exploding aspect aside from being aware; for rattles, check that the glass and frame screws are tight and the seal is intact.
- Stereo/Accessory Gremlins: The Xterra’s stock radio and 6-CD changers (in older models) are known to fail. Replacement with an aftermarket head unit is the best solution for audio issues. Also, power window switches and door lock actuators can wear out – these are easy to swap out with basic tools if they fail.
By now we’ve covered the gamut of common problems. Next, we’ll outline some preventive maintenance tips to avoid these issues, followed by a cost breakdown for major repairs and a FAQ section for quick answers.
Preventive Maintenance Tips for Xterra Owners
Keeping your Xterra in top shape largely comes down to smart maintenance. Here are some key preventive tips to fend off common problems:
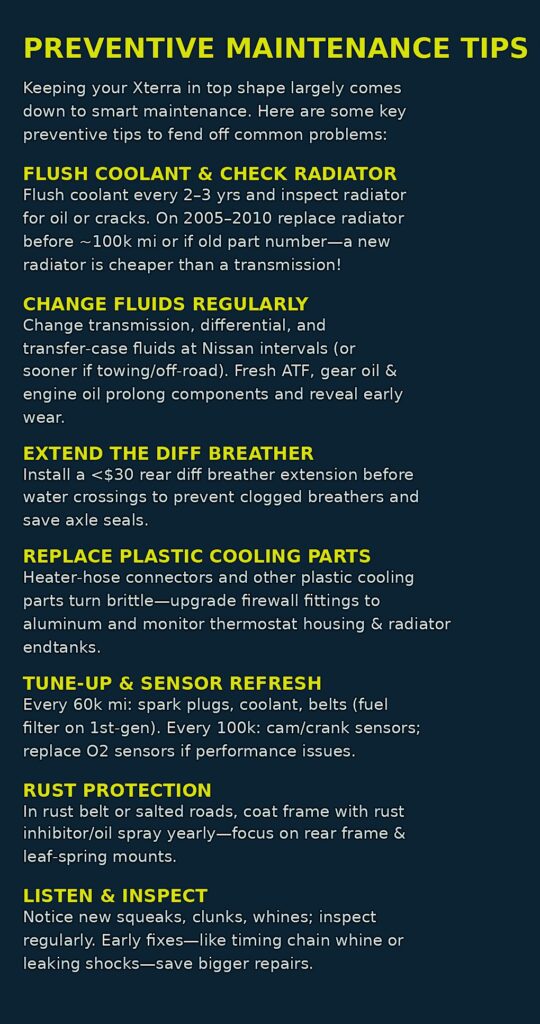
- Flush Coolant & Check Radiator: To avoid the dreaded SMOD, flush your coolant every 2–3 years and inspect the radiator for any signs of oil or cracks. Proactively replace the radiator on 2005–2010 models before ~100k miles or if it’s an old part number associated with failures. A new radiator for peace of mind is cheaper than a new transmission!
- Change Fluids Regularly: The transmission (auto or manual), differentials, and transfer case all benefit from fresh fluid. Stick to Nissan’s recommended intervals or sooner if you tow/off-road. Fresh ATF, gear oil, and engine oil will prolong the life of critical components (and help catch early issues – e.g., metal in diff oil might hint at wear).
- Extend the Diff Breather: If you do any wading in water or off-roading, install a rear differential breather extension. This <$30 mod will prevent clogged breathers and save your axle seals.
- Replace Plastic Cooling Parts: The heater hose connectors on the firewall are plastic and prone to cracking with age. Consider preemptively replacing them with upgraded aluminum fittings. Cooling system plastic bits (thermostat housing, radiator endtanks) eventually become brittle – keep an eye on them.
- Tune Up & Sensor Refresh: Every 60k miles or so, do the spark plugs, coolant, accessory belts, and maybe the fuel filter (for first-gen). Every 100k, consider replacing the cam/crank sensors as noted, and oxygen sensors if you’re having performance issues. A little proactive parts replacement can prevent breakdowns at inconvenient times.
- Rust Protection: If you live in the rust belt or drive on salted roads, the Xterra’s frame and undercarriage bolts can rust. It’s wise to coat the frame with a rust inhibitor or oil spray annually. Focus on the rear frame section and leaf spring mounts which can accumulate mud and salt. (See our Nissan Xterra Frame Rust Repair Guide for detailed tips on stopping and repairing corrosion.)
- Listen and Inspect: Lastly, pay attention to new noises – squeaks, clunks, whines – and inspect the vehicle regularly. Catching a leaf spring crack or a leaking shock early, for example, can save other components. Similarly, if you hear the timing chain whine, addressing it sooner prevents a larger repair. Your “rugged, hands-on mechanic-next-door” intuition goes a long way here!
By following these tips, you’ll prevent many common issues or catch them before they escalate. Now, let’s look at the costs of some common repairs, so you know what to budget or what you’re saving by going DIY.
Downloadable Nissan Xterra DIY Fixes Guide
Cost Breakdown for Common Repairs
Repair costs can vary widely based on where you live and whether you DIY or use a mechanic. Below are ballpark cost ranges for common Xterra fixes (parts + labor):
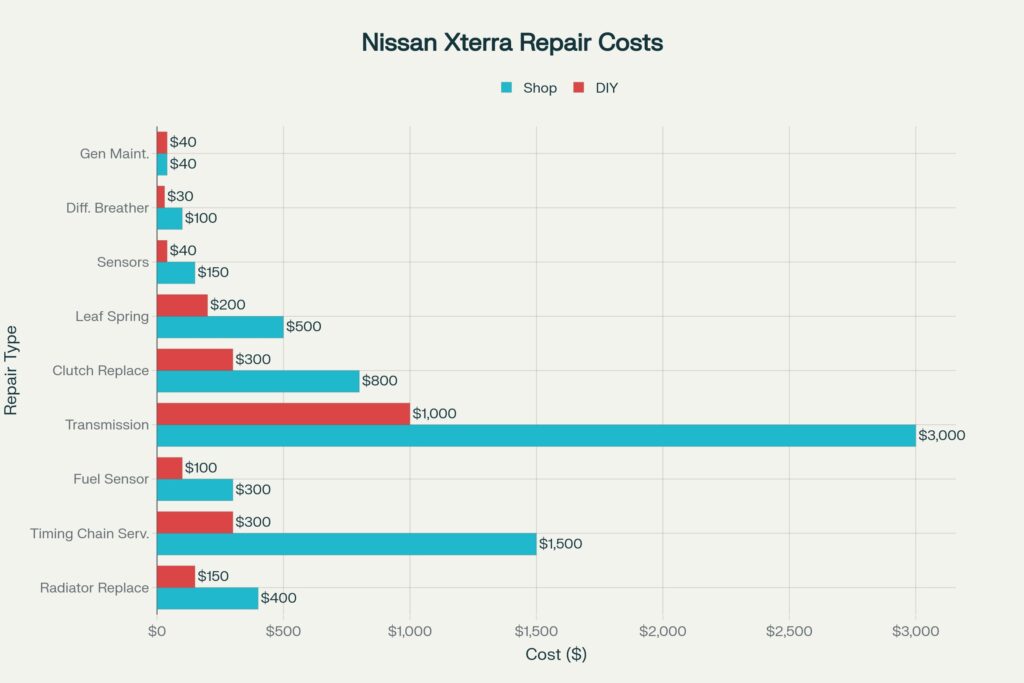
- Radiator Replacement (Preventative for SMOD): Approximately $400–$600 at a shop. DIY could cost around $150–$250 for a quality radiator plus new coolant. This is cheap insurance against transmission failure.
- Timing Chain & Tensioners: Around $1,500–$2,500 at a professional shop (mostly labor). Parts alone might be $300–$500. Nissan’s class-action settlement offered about $450 towards this repair, hinting that total costs easily exceed $1,000. If DIY, you save labor but invest significant time.
- Fuel Level Sensor Replacement: If not covered by recall, expect $300–$500 at a repair shop (mostly labor to drop the tank). The sensor part is ~$100; labor can double that. Some owners report dealer quotes near $800–$1,000 for the full pump assembly. DIY can cut this dramatically – essentially just the part cost if you have the access panel.
- Transmission Replacement/Rebuild: $3,000–$4,500 is typical for a rebuilt automatic transmission installed. A used unit might be sourced for $1,000–$1,500, but then labor still $1k+. This is one of the costliest potential repairs, which is why preventing SMOD is so crucial.
- Clutch Replacement (Manual trans): $800–$1,200 at a shop. Parts (clutch kit and flywheel machining) around $300; labor is intensive (trans removal). DIY is possible for skilled individuals, costing just parts.
- Leaf Spring Replacement: Roughly $500–$700 for both rear springs installed at a shop. Parts are about $200–$300 for a pair of OEM or aftermarket springs, plus new U-bolts. DIY could be done for the cost of parts if you’re comfortable with suspension work and heavy lifting.
- Cam/Crank Sensors: $150–$250 at a shop (diagnosis + parts). DIY cost is very low: parts ~$40–$80 total (for all sensors) and your time. An easy way to save money.
- Differential Breather Kit: Shop might charge $100–$200 to install (though many would never think to offer it). DIY kit costs ~$30 – a cheap afternoon project to potentially save a $1,500 axle rebuild.
- General Maintenance: Oil changes, brake pads, belts, etc., are standard costs (and often DIY by the enthusiast owner). Keeping up with these basics (oil ~$40 DIY, brakes ~$150 DIY vs. $300 shop, drive belt ~$50 part) will prevent secondary problems (like overheating due to a snapped belt driving the water pump).
| Repair | Shop Cost Estimate | DIY Cost Estimate | Notes |
|---|---|---|---|
| Radiator Replacement (Preventative for SMOD) | $400–$600 | $150–$250 | Prevents transmission failure. Quality radiator + coolant. |
| Timing Chain & Tensioners | $1,500–$2,500 | $300–$500 (parts only) | High labor cost. DIY saves labor but is time-intensive. |
| Fuel Level Sensor Replacement | $300–$500 | ~$100 (sensor only) | Dealer may quote $800–$1,000 for full assembly replacement. |
| Transmission Replacement/Rebuild | $3,000–$4,500 | $1,000–$1,500 (used unit only) | Labor extra. Prevention (avoid SMOD) is critical. |
| Clutch Replacement (Manual) | $800–$1,200 | ~$300 (parts only) | Includes clutch kit and flywheel machining. |
| Leaf Spring Replacement (both rears) | $500–$700 | $200–$300 (parts only) | Add U-bolts. Heavy parts; requires proper tools. |
| Cam/Crank Sensors | $150–$250 | $40–$80 (parts only) | Low DIY cost. |
| Differential Breather Kit | $100–$200 | ~$30 (kit only) | Prevents costly axle rebuilds. |
| General Maintenance (oil, brakes, belt) | $40 (oil), $150 brakes | $40 oil, $150 brakes, $50 belt | Shop rates about double for brakes. |
These estimates give you a sense of where the big expenses are. The Xterra is actually fairly affordable to maintain compared to more complex SUVs – many parts are shared with the Frontier pickup and readily available. Doing work yourself will yield significant savings (and satisfaction). Next, we’ll address a few frequently asked questions to wrap up our owner’s guide.
FAQs: Nissan Xterra Common Issues
Q: What are the most common problems with the Nissan Xterra?
A: The most common Xterra problems include the fuel level sensor failure (erratic gas gauge), radiator leaks leading to transmission failure (2005–2010 automatics – the SMOD issue), and on earlier models, timing chain tensioner wear causing engine whine. Additionally, first-gen Xterras saw issues like fuel injectors and EGR valves causing misfires, and many Xterras have had sagging rear leaf springs or other suspension wear. Overall, 2005 is considered a trouble year (coolant/transmission failures), whereas later years like 2009–2015 had most bugs ironed out. Regular maintenance and the preventive steps in this guide can mitigate many of these issues.
Q: What is the “Strawberry Milkshake of Death” in Xterras?
A: “Strawberry Milkshake of Death” (SMOD) refers to the coolant & transmission fluid mixing issue common in 2005–2010 Xterras with automatic transmissions. A defect in the radiator’s internal cooler can crack, allowing coolant and ATF to blend into a pink, frothy liquid that resembles a strawberry milkshake. This mix wreaks havoc on the transmission, often causing it to fail. Symptoms are transmission shuddering, difficulty shifting, or pink sludge in the radiator. To prevent SMOD, Xterra owners often preemptively replace the radiator or bypass the internal cooler. If SMOD has occurred, the fix may involve flushing both systems and likely replacing the transmission – an expensive repair. The key is to catch it early or, better yet, prevent it by addressing the radiator proactively.
Q: How can I fix my Nissan Xterra’s fuel gauge when it’s not reading correctly?
A: A fuel gauge that’s stuck on Empty or gives erratic readings is usually caused by a bad fuel level sending unit (sensor) inside the tank. To fix it, you need to replace that fuel level sensor. Nissan did recall 2006–2008 Xterras for this issue, so check if your VIN was serviced. If not, you can DIY the replacement.
Access the fuel pump/sender module (either via an access panel under the rear seat or by dropping the tank), and swap the old sensor for a new one. After installation, the gauge should read correctly. It’s wise to use an OEM sensor for accuracy. This fix solves the common “fuel gauge not working” problem that many Xterra owners search for.
Q: Which Xterra model years should I avoid, and which are the best?
A: The 2005 Xterra is generally seen as a year to avoid due to the high incidence of radiator/transmission failures (SMOD) and timing chain issues – it has over 400 owner complaints logged. 2006 and 2007 also had a fair number of issues (fuel sensor, timing chain, SMOD), though by 2008 Nissan had made some improvements (and 2009+ got the updated radiator).
The first-gen (2000–2004) is simpler and has fewer catastrophic issues, though 2000 had some quirks (e.g., manifold cracks) and is now quite old. Many Xterra enthusiasts consider the 2011–2015 models the best: they benefitted from all the prior fixes – no SMOD risk, improved timing chain components, and generally excellent reliability. Notably, 2015 (the final model year) is rated one of the most reliable and desirable used Xterras. So, in summary: be cautious of 2005–2007 unless you confirm the fixes have been done, and if you want a trouble-free experience, look for 2009 or newer.
Q: Is the Nissan Xterra expensive to maintain?
A: Overall, the Xterra has reasonable maintenance costs. Routine upkeep (oil changes, brakes, belts) is on par with other SUVs and much can be done by a DIY enthusiast. Parts are fairly affordable since the Xterra shares components with the Nissan Frontier and other models. The expensive repairs are the rare ones – e.g., if the timing chain or transmission needs replacement, those can run into the thousands (as detailed above).
However, these big-ticket failures are avoidable with preventive care. The Xterra doesn’t have numerous high-tech systems that can fail – it’s a rugged, old-school SUV. Many owners report it as cheaper to maintain than more modern SUVs, especially if you do some work yourself. Keeping up with fluid changes, addressing small problems early, and using quality replacement parts will ensure maintenance costs stay reasonable. In short, when cared for, an Xterra can be an affordable and very dependable 4x4 for the long haul.
Conclusion & Thoughts
The Nissan Xterra remains a beloved SUV, combining rugged trail capability with everyday practicality. Like any vehicle, it has its common problems, but as we’ve shown, most have clear solutions – many of which you can tackle in your garage with the right tools and know-how. From avoiding the transmission-killing SMOD to fixing a finicky fuel gauge, staying proactive on maintenance is key.
Use this guide as your roadmap to keep your Xterra running strong: listen for those timing chain noises, watch the temperature gauge, and don’t ignore small symptoms that could hint at bigger issues.
Remember, a well-maintained Xterra can easily clock over 200,000 miles and still hit the trails every weekend. It’s all about being that “mechanic-next-door” for your own vehicle – handling the DIY fixes you’re comfortable with, and knowing when to consult a pro for the tougher jobs. By addressing these common Xterra issues head-on, you’ll ensure your SUV remains a reliable partner on all your adventures. Happy wrenching, and enjoy the ride – both on and off the road!